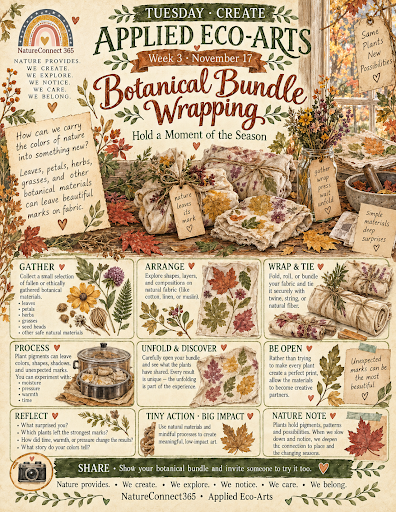
Hold a Moment of the Season
Gather a small collection of fallen or ethically gathered leaves, petals, herbs, grasses, or other safe botanical materials and arrange them on natural fabric. Fold, roll, and tie the fabric into a bundle, then explore how moisture, pressure, warmth, time, and plant pigments can leave colors, shapes, shadows, and unexpected marks behind.
Rather than trying to make every plant create a perfect print, allow the materials to become creative partners.
The unfolding is part of the experience.
🌱 Materials
Small piece of natural fabric such as cotton, linen, or muslin
Fallen or ethically gathered leaves
Flower petals or spent blossoms
Safe herbs or garden plants
Grasses or other soft botanical materials
Twine or natural cord
Scissors
Small bowl of water
Spray bottle or sponge for lightly dampening fabric
Wooden spoon, smooth stick, or dowel for rolling, if desired
Protective work surface
Reusable gloves, if desired
Absorbent cloth or reused paper
Journal or sketch paper
Pencil or colored pencils
Optional natural dyes from Week 1
Optional Color Collection Journal from Week 2
For methods involving heat:
Heat-safe pot or steamer
Water
Tongs
Heat-resistant surface
Adult supervision
Safety Note: Use only plants you can safely identify. Some plants can irritate skin, cause allergic reactions, or be toxic. Avoid poison ivy, poison oak, poison sumac, unknown berries, mushrooms, and unfamiliar plant materials. Confirm that gathering is permitted. Children should have close adult supervision. Any method involving boiling water, steaming, or heated equipment should be completed by or with a responsible adult.
✨ Create
1 • Visit the November Landscape
Begin outdoors if possible.
Walk slowly through a garden, yard, park, woodland edge, or another familiar place.
Look for botanical materials already being released by the season.
Notice:
Fallen leaves
Faded flower petals
Dried grasses
Seed heads
Garden herbs
Weathered plant stems
Berries remaining on shrubs
Leaves marked by insects
Colors changing toward brown, gold, rust, gray, and deep red
Plants that remain green
Materials softened by rain or dried by wind
Before gathering anything, spend a few moments simply looking.
November may appear quieter than earlier autumn, but quiet does not mean empty.
2 • Gather with Care
Choose only a small number of materials for your bundle.
Whenever possible, gather materials that have already fallen or use prunings and spent garden plants that would otherwise be removed.
Ask:
Is gathering permitted here?
Does this plant need to remain where it is?
Is this material providing food or shelter?
Do I know what this plant is?
How little do I actually need?
Leave abundant plant material outdoors to continue participating in habitat, decomposition, soil building, and seasonal cycles.
3 • Meet Each Material
Arrange your collection on a light-colored surface.
Before placing anything on the fabric, explore each material individually.
Notice:
Color
Shape
Texture
Veins
Edges
Moisture
Scent
Thickness
Flexibility
Evidence of insects or weather
Changes associated with the season
Gently rub a safe plant material on scrap paper or fabric.
Does it leave a mark?
Not every plant that appears colorful will transfer its color easily—and some less colorful plants may surprise you.
4 • Record the Before
Make a simple record of your materials before bundling.
You might:
Sketch them
Photograph the arrangement
Trace a leaf
Create color swatches
Write their names
Describe their textures
Record where they were found
Add observations to your Color Collection Journal
Try giving some colors names of your own:
November berry
Rain-dark leaf
Meadow straw
Frosted sage
Rust edge
Quiet green
Woodland brown
These observations create a “before” record that you can compare with the marks revealed later.
5 • Prepare the Fabric
Lay your natural fabric flat on a protected work surface.
If desired, lightly dampen it with clean water using a spray bottle or sponge.
Notice the fabric before adding plants.
How does it feel?
How tightly is it woven?
Does water immediately soak in or remain briefly on the surface?
If you explored natural dyes during Week 1, you may choose to begin with fabric that already carries a pale wash of botanical color.
6 • Arrange the Botanicals
Place your botanical materials across one portion of the cloth.
Experiment with:
Repeating leaves
Alternating shapes
Overlapping petals
Lines of grasses
Radial arrangements
Mirrored patterns
Color groupings
Large and small forms
A completely intuitive arrangement
You might create a carefully planned composition—or allow the materials to tell you where they seem to belong.
Remember that the arrangement you see now may look very different after the bundle is opened.
7 • Fold, Roll & Wrap
Fold the uncovered portion of fabric over the botanical arrangement.
Press gently.
Then roll the fabric tightly around itself or around a smooth stick or dowel.
Wrap twine around the bundle several times and tie it securely.
Notice how the materials disappear inside.
Something that was visible has now become temporarily hidden.
The bundle holds a small encounter among plant, cloth, moisture, pressure, and time.
8 • Choose How the Bundle Will Rest
There are several ways to explore botanical bundle wrapping.
For a simple no-heat investigation, keep the bundle slightly damp and allow it to rest in a protected place before opening it.
You may also experiment with pressure by placing the wrapped bundle beneath a safe, moderate weight.
For a heat-assisted version, an adult may steam the securely tied bundle using appropriate heat-safe equipment.
Different methods can create very different results.
If working with children, the no-heat version allows the emphasis to remain on sensory exploration, prediction, patience, and discovery.
Whatever method you choose, remember:
The goal is exploration rather than a guaranteed permanent print.
9 • Practice Waiting
Allow the bundle time to rest.
Before opening it, make a prediction.
What do you think will happen?
Will:
A leaf leave its shape?
A petal release color?
A green leaf remain green?
Moisture create unexpected patterns?
Several colors blend?
Nothing visible happen at all?
Record your prediction.
Waiting becomes part of the creative process.
10 • Unwrap the Bundle
When your chosen resting process is complete, untie the cord and slowly open the fabric.
Do not rush.
Peel back each layer.
Remove the botanical materials one at a time.
Look closely.
Perhaps you will discover:
A recognizable leaf
A faint botanical shadow
A wash of yellow
A surprising pink or purple
A brown impression
A blurred shape
A vein pattern
A watery edge
Overlapping colors
Almost no visible transfer
Every result provides information.
The plants do not have to produce the image you expected for the experiment to be meaningful.
11 • Let the Cloth Dry
Remove loose botanical material and lay or hang the fabric somewhere appropriate to dry.
If you plan to keep or wash the fabric, remember that untreated botanical colors may fade, shift, or disappear over time.
That change can become part of the exploration.
Once dry, compare the cloth with your original sketches, photographs, or Color Collection Journal.
Ask:
What remained? What changed? What surprised me?
🎨 Create with Botanical Bundles
Use your finished fabric to:
Create a botanical color study
Make a seasonal wall hanging
Add a page or fabric sample to a nature journal
Create a small banner
Make a bookmark
Wrap a nature journal
Create fabric collage pieces
Make a seasonal patch
Add simple embroidery
Pair botanical marks with written observations
Create a November color collection
Compare several plant species
Make a fabric nature map
Create a gratitude cloth
Save a piece for next week’s gratitude project
🔍 Notice
Pay attention to:
Which plants released visible color
Which colors changed during the process
Clear versus blurred impressions
Leaf veins that transferred
Differences between petals and leaves
How moisture moved through the cloth
Areas where several plants overlapped
Changes created by pressure
Changes created by time
Differences between fresh and dried materials
The scent of the bundle before and after opening
The texture of the cloth
Marks you expected
Marks you did not expect
Places where no visible mark appeared
Notice absence, too.
A plant can participate in the experience without leaving a dramatic visible trace.
💭 Wonder
Why do some plants release more color than others?
Where are pigments located within plants?
Why might a colorful flower leave a pale mark?
Why do some botanical colors change when heated?
How does moisture help color move?
What difference does pressure make?
How might fabric type affect the result?
What happens when two plant pigments overlap?
Why do natural colors sometimes fade?
What can an unexpected result teach us?
Can something temporary still be meaningful?
How does waiting change the experience of making?
What happens when we share creative control with our materials?
🌎 Connect
Plants contain many compounds that contribute to the colors we see in leaves, flowers, fruits, and other structures.
Chlorophyll contributes green. Carotenoid pigments contribute many yellows and oranges. Anthocyanins can contribute reds, purples, and blues in some plants.
But seeing a color in a plant does not guarantee that the same color will transfer to cloth.
Pigments and other plant compounds respond differently to water, temperature, acidity, fabric, oxygen, and time. Some readily move into fibers. Others remain within plant tissues or change when exposed to different conditions.
This makes botanical printing an exploration of both art and observation.
The fading of a botanical mark can also remind us that natural materials continue to change.
A print does not have to remain unchanged forever to hold the memory of an encounter.
🌈 Explore Further
Compare fresh and fallen leaves from the same plant.
Test several plant materials on scrap fabric.
Compare cotton and linen.
Try bundles with and without added moisture.
Compare a pressed bundle with an adult-assisted steamed bundle.
Record colors before and after processing.
Photograph the bundle at each stage.
Identify the plants you used.
Research one pigment found in plants.
Create botanical bundles during different seasons.
Compare garden plants with fallen woodland leaves.
Draw the marks created on your cloth.
Give unexpected colors descriptive names.
Add stitching around a botanical impression.
Save part of your fabric for next week’s Gratitude Cloth.
📸 Share
Photograph your botanical materials before wrapping and your cloth after it is opened.
Share:
The place where your materials were gathered
A plant you recognized
A color you expected
A color that surprised you
A mark you discovered
Something that did not transfer as expected
Your favorite botanical impression
A question that emerged
What waiting felt like
The name you gave your finished cloth
Share with #NatureConnect365 and invite others to discover what happens when plants and cloth are given time together.
❤️ Tiny Action • Big Impact
Gather only what you need.
Fallen leaves, dried stems, seed heads, berries, and fading plants may still be providing food, shelter, nesting material, soil protection, and overwintering habitat.
Before collecting a botanical material, ask:
Can I create with a few and leave the many?
Choose a small collection for your artwork and allow the larger community of plant material to remain within the ecosystem.
Your bundle can hold a few traces of November while most of November remains outdoors doing its living work.
📝 Nature Note
I gathered my botanical materials from:
The plants I recognized were:
Before wrapping, the colors were:
The textures I noticed were:
I predicted that:
I allowed my bundle to rest by:
When I opened the bundle, I discovered:
The color or mark that surprised me was:
Something that did not happen as expected was:
The materials taught me:
I would like to carry this mark into next week’s Gratitude Cloth:
I named my botanical bundle:
#NatureConnect365 #AppliedEcoArts #BotanicalArt #BotanicalBundle #EcoPrinting #NatureArt #FiberArt #PlantArt #NatureCrafts #CreativeNature #NatureConnection #NovemberNature #AutumnCrafts #SlowMaking #CreateWithNature